You CAN do it yourself – fixing a Kenmore Elite fridge – I’m serious
Sometimes your fridge takes a crap.
Ours started making a terrible knocking noise when you closed the doors. We’ve been down this road before. Last time we paid a guy $175 to fix it, or so we thought. A glacier was growing behind and under our veggie drawers. We had an ice problem.
We took the fridge apart Saturday we discovered the condenser in the fridge was completely iced up. The ice obstructed some fan blades and caused the noise and forced the fridge to shut down. We pulled everything out, turned the fridge off, and defrosted the ice sheet. On it’s own, this would fix the problem for anywhere from 3-9 months – it takes a while for that ice to build up. But we decided to find the root of the problem since about 10 months ago a repair man came and allegedly fixed it!
The defrost sensor controller failed. We figured this out by following the directions we found on www.applianceblog.com. We needed a multimeter. This is one of those tools I don’t know how to use, so I got assistance to test the resistance of the sensor – even without it we could have tested the other things and used the process of elimination. We ordered the part online. Make sure to carefully note any part numbers on a part as well as how they look. The listed part for my model number fridge was wrong and would not have worked. Because I took pictures I could find the exact part by working with the folks at the appliance place. Call the appliance part places if you have questions. The part came today, I took everything apart again and replaced it in about 30 minutes (it’s sooo much faster when you’ve done it once).
Hold on for some crappy pictures of me repairing my fridge. Cause seriously, anyone can do this.
The secret to DIY is a plain language google search. I promise that if something in your house breaks someone out there in internet land already figured out how to fix it and made a video or posted on a forum. My fridge started making a crazy noise when the doors were closed and then displayed an error ‘Er rF’. I started with this google search, “fridge makes noise when doors close Er rf kenmore”. 5 minutes of reading told me that it’s actually an LG branded for Kenmore and this is a common problem. Literally the first video on youtube is my problem. The hardest part wasn’t figuring out what to do, it was unloading the entire thing to get to the problem.
A note on forums. Community forums are a wealth of information that you can access without joining. Be leery of large generic services like fixya and justanswers. They will rarely be useful. Go to the enthusiast pages. Pages run by people with a passion – and yes, people do have a passion for fixing appliances. You can do a google search for “refrigerator repair forum” the entire first page is full of great forums. BTW, www.diychatroom.com is my favorite general resource with a remarkable community of folks who will walk you through just about anything.
Tips: Write down or snap a pic of the MODEL number of your fridge. Take pictures as you take things apart making sure to note locations of screws and connectors and electrical connections. Take pictures of parts – this will be critical.
Step One is the worst: Unload the fridge and freezer
Dealing with a fridge full of warming food sucks. You may catch the problem after a day of it not working and unlike when you lose power, a malfunctioning fridge might actually warm up enough in 24 hrs to ruin your food. When in doubt throw it out – especially dairy and raw meat. Anything that can freeze safely we put in our deep freeze (tortillas for example). Some things were fine on the counter for a couple of days (my enormous collection of condiments). Everything else went in coolers.
Full disclosure: today was actually the second time I’ve done this since the weekend. I assure you my fridge wasn’t spotless inside when I took it apart the first time. (BTW – Who remembers old episodes of Cribs before stylists would stock celebrity fridges with the brands they promote?)

Upside of cleaning out your fridge: it looks brand new all sparkly clean
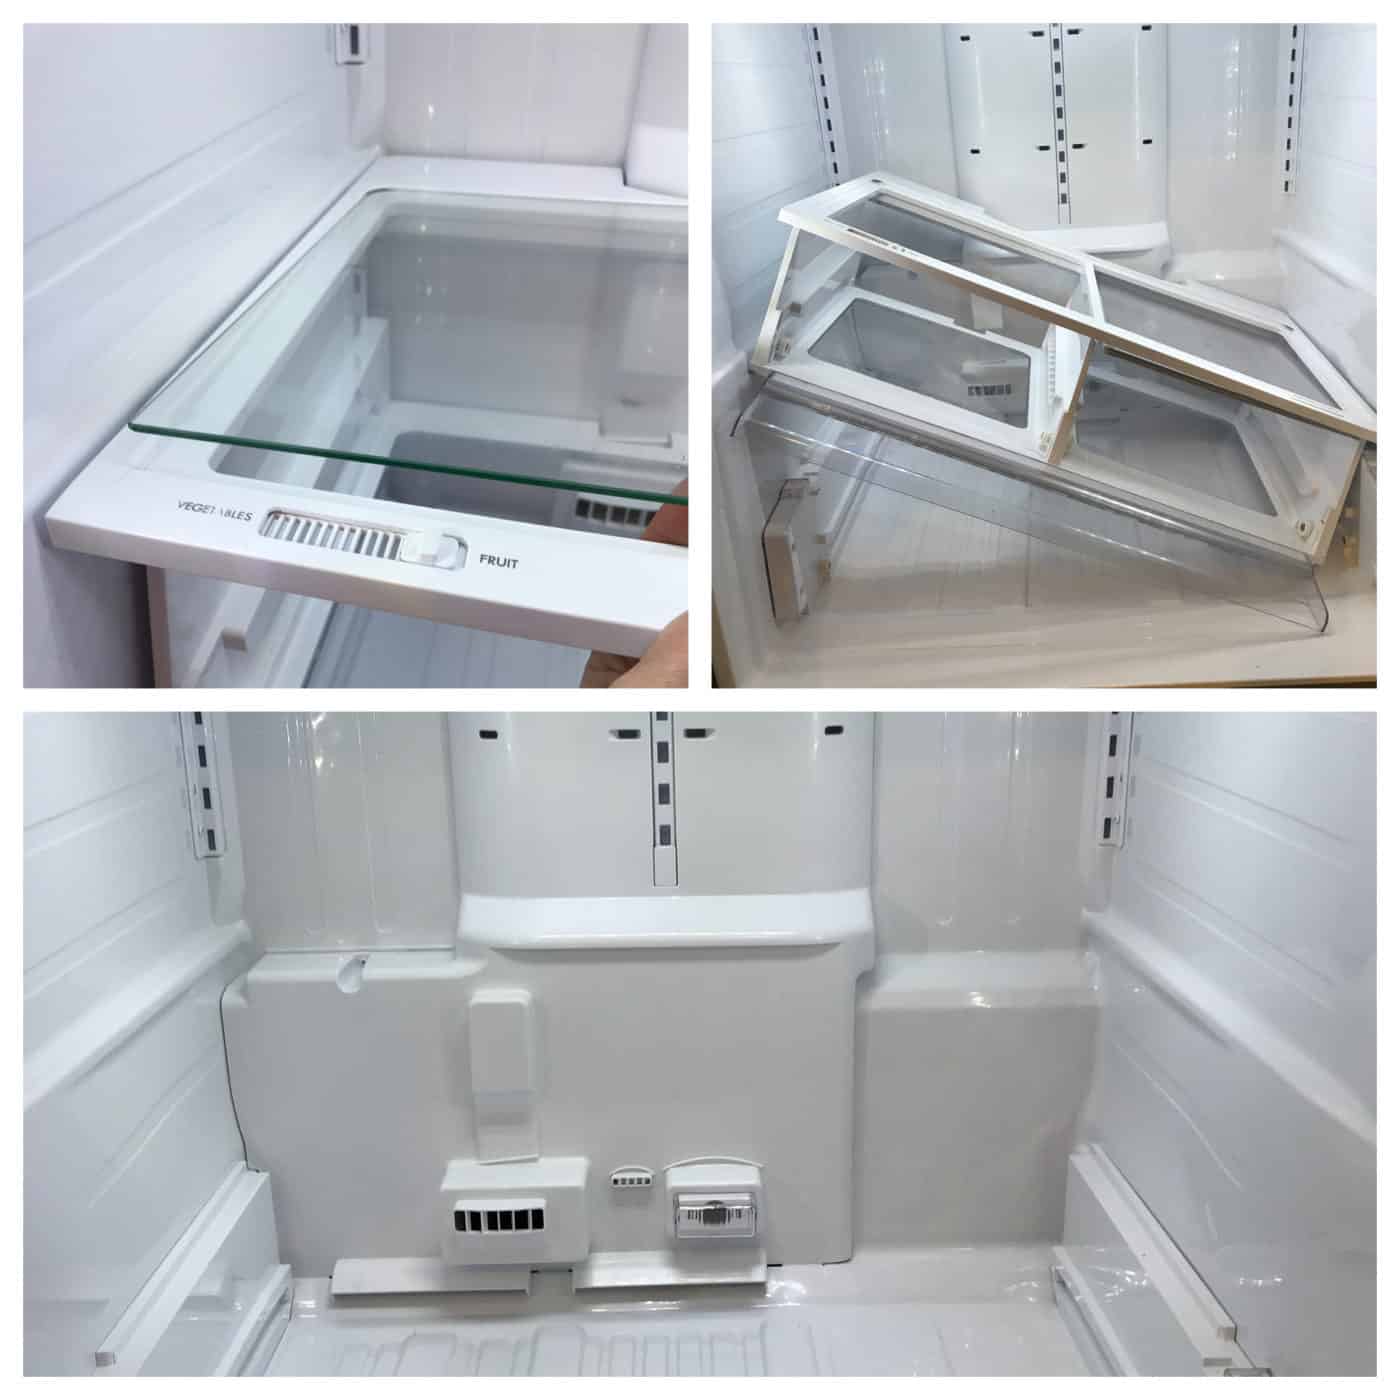
Step two: remove all the shelves.
While you’ve got everything out of it give that bitch a really good cleaning – why was there pancake batter under my veggie drawer?!? It is easier to clean them when they come to room temperature, that way you aren’t fighting condensation on cold glass. Set the shelves and drawers somewhere they aren’t going to get knocked around or scratched.

Be careful removing the glass shelf. Mine lifted up in the front and slid forward. My old fridge had clips at the back and lifted up from there. The drawer unit had to tip some to get out of the opening.
Step three: start unscrewing.
Find the obvious screws on the drawer supports and remove them. Put them in a container with a lid or a zip lock bag. Don’t set them on the counter or in your pocket – you will lose one. It will drive you crazy and add hours to a project. The right side support has a button to change from produce to deli – this is wired to the fridge. You need to disconnect it.

screws hold the drawer supports to the inside of the fridge.
Four screws hold the rear panel to the fridge: one obvious one and three hidden ones. I removed the plastic clips at the top and bottom of the shelf support and revealed three screws that hold everything together.

Locations of Four screws that hold on the back panel of the Kenmore French Door Refrigerator.

I used a flat head screw driver to pop off two plastic clips and reveal three hidden screws holding the rear panel to the fridge.
A few words on electrical connections. Designers and engineers seem to love to invent new ways to connect wiring harnesses. This means that hardly any two work the same way. The connection for the drawer support required you to DEPRESS a tab with a screw driver. The part I replaced was different kind of connection actuated by pressing a lever. Some require prying open. And some only pulling apart. Look carefully at a connection before you start attacking it with a screwdriver – they seem prone to break if you look at them the wrong way.

To disconnect this wiring harness you need to depress a tab while sliding the connection apart.
Pulling on plastic is stressful (get it?)
Once I removed the screws the panel did not magically pop out. Careful examination and some prying with a plastic body tool (a butter knife would work in a pinch, but for pete’s sake be careful) revealed two tabs at the bottom that were hooked into the floor. Logic dictated that the top must pull forward and then lift up to remove. But to make this happen I flexed the panel slightly forward in the middle to disengage the top. Then pulled the top forward while pulling up. The take away message is look and think before you pull on plastic parts. I rarely find explicit directions for this kind of thing. Sometimes it takes some trial and error. Go slowly and gingerly to avoid breaking the tabs.

Pull the top down slightly to flex and then out while lifting away from the floor of the fridge. These are the sort of pictures that can be hard to find.
Replacing the part

Yet another kind of electrical connection held the part we need to replace. The two sensors were installed exactly the same way as the old one. Then everything got plugged back in.
Then it was just a matter of unplugging the old one (we put it back in on Saturday so we could turn the fridge back on) and plugging the new one in. Then carefully reassembling everything (this is where pictures can be especially helpful to see how things went).
Take away
Not everything is a diy fix. But a simple google search and an hour of reading helped me diagnose the problem. Most of diy is research and just doing it. Deciding to give it a try is half the battle. There is a strong motivation in saving money. The part cost $20 plus a little shipping. I’m sure a repair man would have charged me $200. I get a strong sense of satisfaction in saving that $180. Also, I’m proud of myself. I was self sufficient and used some easy resources to get it done. And I’m putting up some crappy pictures you don’t see very often, the step by step details that sometimes get left out, cause I need to brag some.
Go fix something.
Sooooo satisfying.
17 Comments
NTB
Worse refrigerator ever. Don’t invest in one.
Jay
How did you know it the defoster sensor? Can you tell us the Multimeter voltage reader output reading for the bad vs the good? A bit more details of the finding the problem and links to where you found help would be useful. For mine, I did not find any ice build-up problem, but the freezer is warm....is this the defoster issue?
How do you defrost the bottom of a Kenwood Elite a Kenmore Elite just the freezer part
Paul LaRosa
Do you have to remove the fresh air fan on the top of the back panel before removing it. It appears to be screwed into the panel. If it has to be removed how did you do it. Also only see 3 screws holding in the back panel. The two hidden behind the tabs and the one on the lower left that's fully exposed. Location of the 4th screw?
So my refrigerator smelled like dead chicken juice. Of course, the fact that I defrosted chicken without a plate about a week ago may have been a contributing factor. Thanks to my wife's olfactory acumen and skills, I was on the lookout for week-old chicken juice. You and I have the same refrigerator, and your "some crappy pictures of me repairing my fridge" were just what I needed to de-chicken-juice mine. The little video, "satisfying click of a part going into place" was what I needed to remove the crisper drawer structure. If it went IN that way, it should come OUT by LIFTING AND PULLING GENTLY. And it did. Fortunately, I do not have to replace any parts, and when I saw how to remove the back plate, I didn't think I would have to go that far. Alas (in for a penny, in for a pound), there was tell-tale evidence that some had dripped behind the back panel. Armed with the knowledge and "crappy pictures" you shared, not to mention your encouragement, EVERY LAST DRIP of hiding chicken juice has been excised. If you want pictures of what was producing the fowl (sic) smell, please email me with instructions on how to send them to you. Thanks for the knowledge, and ESPECIALLY the "crappy pictures." And my sweet-smelling refrigerator thanks you as well.
CharlieY
You did a very nice job on your directions. Thank you. I just used them--not to replace the sensor, which I may need to do, but to melt ice build-up behind the back panel. Several additional thoughts: We took a picture of the shelf positions before removing. We had to melt ice build-up behind the drawer unit before we could pop it out. We did not need to remove the right-side support; we removed only the left one. This is important: Removing the 4 screws from the back panel: The left visible one is obvious. Keep it separate from the others. Regarding the center column shelf support, it has different size holes at the top versus the bottom. TAKE NOTE! And the 3 screws in the center column are ALL DIFFERENT! The larger silver machine screw goes in the bottom hole, the small panhead screw goes at the bottom of the center column shelf support (just above the panhead screw), and the larger panhead screw goes at the top of the center column. When I pulled the back panel out, I just had to swing it to the right out of the way. And finally, when the refrigerator was plugged back in, it took 2-3 hours before the temperature started to drop noticeably.
Scott Schada
OMG For four years my left crisper on my "Elite" three French door counter Kenmore (LG) refrigerator has ruined countless cucumbers, green peppers and other produce. Finally I removed the crisper during cleaniong and saw this wall of ice against the back wall of the unit. So it's a sensor!!!!! I love you and the Internet!! I was sure I needed to toss this $3000 unit due to a faulty compressor.